Hard Drive Upgrade
An Install Guide On How To Upgrade Your Own PC Hard Drive

Hard Drive Upgrade Installing Guide

Installing The Second Hard Drive

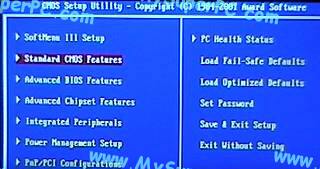
With the installing of the hard drive complete, the computer can be prepared for being powered on. Insert the IBM Drive Fitness Test floppy disk into the floppy drive. This will be the first floppy needed during the hard drive upgrade. Having it inserted in the floppy drive when the computer is powered on will ensure the computer finds something when it gets as far as booting from the floppy drive. At this point in the hard drive upgrade, it's only necessary to re-connect the mouse, keyboard, monitor and power cord. And I left the computer case off since I knew I'd be getting back inside the computer shortly. I powered on and entered the ABIT KT7A BIOS by pressing the DEL key while the BIOS splash page was displayed. Here again is the main BIOS menu for the ABIT KT7A motherboard in use in my computer. I'm in the BIOS to verify that the computer recognizes the new hard drive as the slave.
ABIT KT7A BIOS main menu


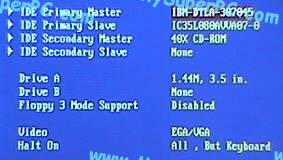
Going to the "Standard CMOS Features" menu now shows both the old hard drive and the new hard drive configured into the system. The old hard drive, the IBM Deskstar 75GXP 45GB, is configured as the Primary Master and shows as "IBM-DTLA-307045". The new hard drive, the IBM Deskstar 120GXP 80GB, is configured as the Primary Slave and shows as "IC35L000AVVA07-0".
ABIT KT7A BIOS primary master and primary slave chacteristics for old drive (IBM Deskstar 75GXP 45GB hard drive) as primary master and new drive (IBM Deskstar 120GXP 80GB hard drive) as primary slave .


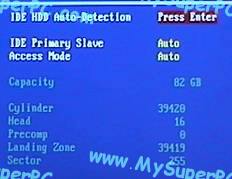
Now by selecting the value for IDE Primary Slave and hitting enter it's possible to see the hard drive characteristics of the new hard drive, the IBM Deskstar 120GXP 80GB hard drive. Notice, the capacity is 82GB (hmm, 2GB more than advertised - bonus!).
ABIT KT7A BIOS hard drive characteristics for the new hard drive (IBM Deskstar 120GXP 80GB hard drive).


Skip Ahead

  What You Need For A Hard Drive Upgrade - Home
  Screws, Antistatic Wrist Strap, Hard Drive Fitness Test
  Norton Ghost
  Norton Ghost Boot Disk Select Type
  Norton Ghost Boot Disk Create
  Norton Ghost Finish
  Old Hard Drive Partitions
  General Considerations About Upgrading The Hard Drive
  BIOS Changes
  Add The New Hard Drive - Jumper Pins
  Mounting Holes, Drive Cage
  Hard Drive Connectors
  Mounted In Drive Cage
  Installed Inside Computer
  Recognized In BIOS
  Hard Drive Fitness Test
  Copy Old Hard Drive To New Hard Drive
  Norton Ghost Source And Destination
  Norton Ghost Destination Drive Details
  Norton Ghost Progress And Finish
  Final Steps
  Site Map


© 2001-2015, Rob Williams, all rights reserved.
Building your own computer!  My Super PC - Click here when you're ready for the ultimate upgrade!  How to build an affordable, quality, fast PC!

My Tutorials
Build, Upgrade Help
Computer Memory Upgrade
Hard Drive Upgrade
Video Card Upgrade
My Super PC


Even More Help
MySuperPC Forums


Great prices on computer parts
Crucial
Crucial UK & Europe
Newegg
PCMicroStore
TigerDirect
ZipZoomFly


Great software prices
Amazon


Deals and Rebates
Amazon Specials
Newegg Rebates
TigerDirect Bundles
ZipZoomFly Rebates


Web Hosting
Yahoo! Web Hosting


Utilities
Carbonite Backups
Mozy Backups
Norton AntiVirus, Tools
PC Tools


Laptops
HP Laptop Deals
Sony VAIO Wide Screen