Computer Assembly - How To Assemble A PC
First Boot
As a computer builder - a builder of PC's - you must make changes to BIOS parameters. Some people are a little squeamish about this, but that's the facts. Don't worry, you'll get over it. The BIOS parameters are stored in a type of memory called CMOS. Thus the name of the menu system for changing the parameters is "CMOS Utility Menu". The reason I'm telling you this right up front before the first boot is that it's possible to change the BIOS parameters in such a way that the computer will not boot - it will just sit there, dark and lifeless, with only the sound of the fans to keep you company. I suppose it's even possible that the motherboard could arrive with the BIOS parameters completely out of whack giving the same results without you having changed a thing. Therefore, it's important to know how to "clear the CMOS" as the first thing to try should this sympton occur.
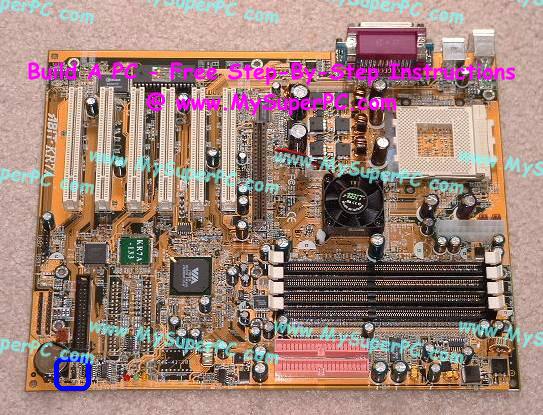
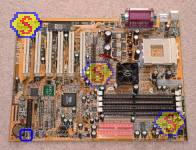
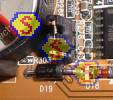
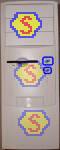
The sure-fire way to clear the CMOS is with the jumper pins. Keep in mind I'm using the ABIT KR7A-133 motherboard, so check the manual for your own motherboard if it's different. The jumper pins are located at the blue circle. When clearing the CMOS, the computer should be turned off and everything unplugged from the back.
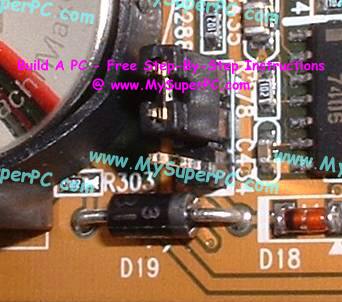
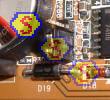
Here's how the jumper pins look with the jumper set in the normal position. Although the jumper is small, it should be easy enough to remove it with just your fingers.
Here's the setting to clear the CMOS. Leave the jumper like this for at least three seconds. Then return the jumper to the normal position. The CMOS is now cleared and you're ready to go.
Ok, with that little bit of failure procedure out of the way, the computer is ready for it's first boot. Naturally it won't come all the way up. The floppy drive and hard drive haven't even been installed yet. But this is an important test. It will verify the processor, CPU cooler, RAM and video card are all installed properly and working.
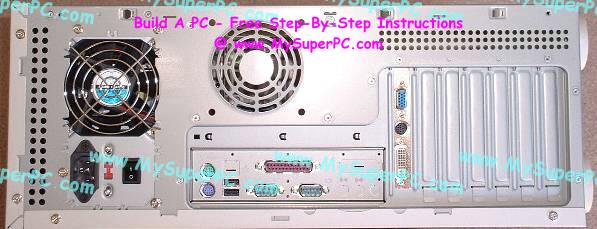
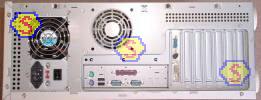
Here's how the back of the computer case looks at this point.
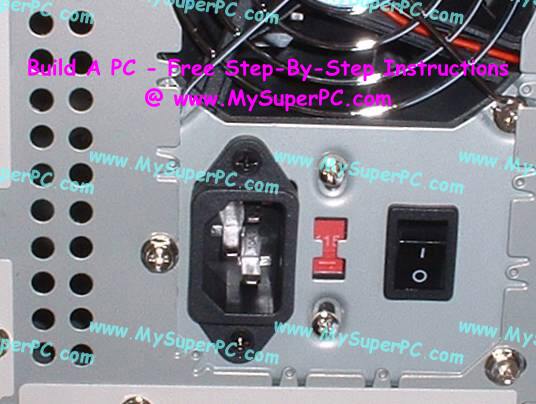
Verify the power switch in the back of the computer is set to the off position (set to 0 - zero). Connect the power card that came with the computer case into the back of the computer and plug it into a wall outlet. Connect the power cord that came with the monitor into the back of the monitor and plug it into a wall outlet.
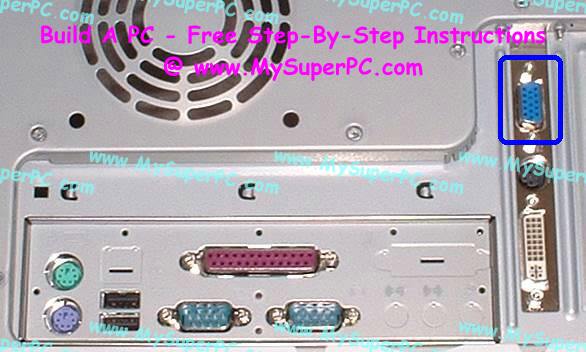
Connect the keyboard and mouse into the back of the computer (circled in blue). The connections are color coded and are keyed so they can only be plugged in one way.
Connect the monitor cable to the video connector on the video card (circled in blue).
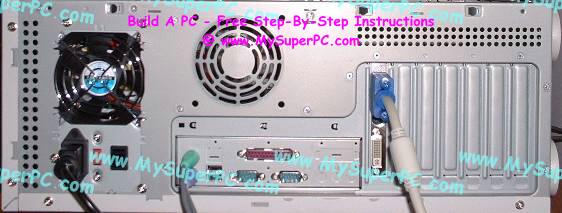
Here's how the back of the case looks with all of these connections made.
Turn the monitor on and give it 10 seconds to warm up. The monitor should make a degauss noise when you turn it on, which sounds similar to the noise a TV makes you first turn it on. Letting the monitor warm up will ensure you see as much as possible when you turn on the computer. The monitor LED will probably be blinking green.
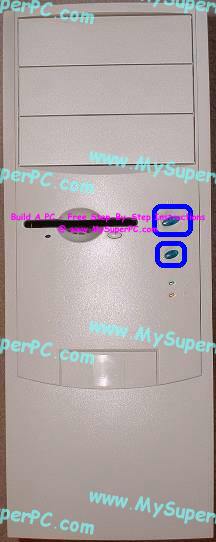
Leave the computer case cover off. You'll want to look inside as part of this test, plus you'll be getting back inside the computer soon enough, anyway. Flip the power switch in back of the computer to the on position (set to 1 - one). This is it! Press the power button on the front of the computer case. The power button is the top blue-circled button on the front of the Antec KS282 case. The bottom blue-circled button is the reset button.
It will look as if nothing is happening for a few seconds, but you should hear the fans running. Check and make sure each fan is actually spinning including the CPU cooler fan, the fan mounted on the video card, the fan mounted in back of the power supply and any other fans mounted on the motherboard. The monitor screen will be blank. Then you'll hear the monitor make a degauss noise again and the monitor indicator will burn steady green.
The first thing the monitor displays, but very briefly, is the video card BIOS header which in my case identifies the video card as a GeForce 4200, but don't be concerned if the video card BIOS header is not observable. It may not be observable on powerup, but it will be observable if the computer is reset. Next the computer emits a single beep from the internal speaker. The single beep indicates all is well. If the computer had detected something wrong then it would have emitted a beep code which could be any combination of long and short beeps.
Immediately after the beep is emitted, the BIOS header screen is displayed. The monitor should be sufficiently ready by this point that the BIOS header screen is observable. The BIOS header screen will show how much RAM is configured in the computer, so you can verify that looks correct. The BIOS header screen will also show the processor speed, but this may default to a slower speed than what is actually in the computer, which is fine. It's actually pretty hard to pick out this kind of information "on the fly" the first time. After a few seconds, chances are the computer will halt showing a "CMOS checksum error - defaults loaded" message. Now you have a chance to examine the screen at your leisure.
The Logitech wireless keyboard and mouse may need to be initialized before they will work. Turn the keyboard over and press the small, gray "Connect" button. Turn the mouse over and press the small, gray "Connect" button. And finally, press the small, gray "Connect" button on the Logitech wireless base. The wireless base should be in close proximity to the keyboard and mouse, say within a couple of feet. This initialization only has to be done one time ever. Of course, if the keyboard or mouse stops working for some reason then one thing to try is the "Connect" buttons again. The batteries in the mouse should last almost six months. The batteries in the keyboard should last over a year. If the keyboard or mouse ever stops responding and the "Connect" button doesn't do the trick then the problem is most likely the batteries.
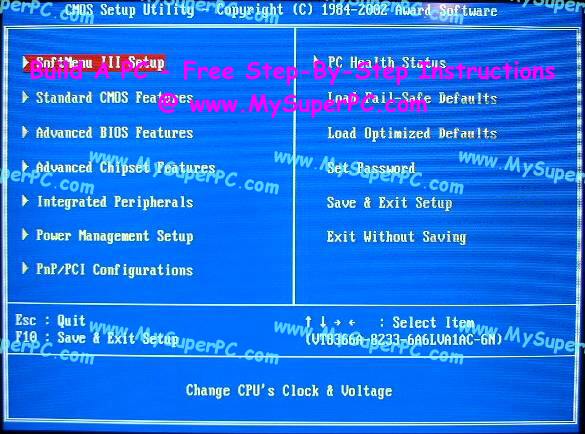
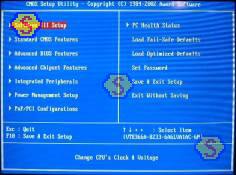
At the bottom of the screen is message stating "Press F1 to continue, DEL to enter setup". Push the "Delete" key to enter the "CMOS Setup Utility" menu. The key labeled "Delete" is arranged in the lower-left of a keypad of six keys on many keyboards, including the one I'm using.
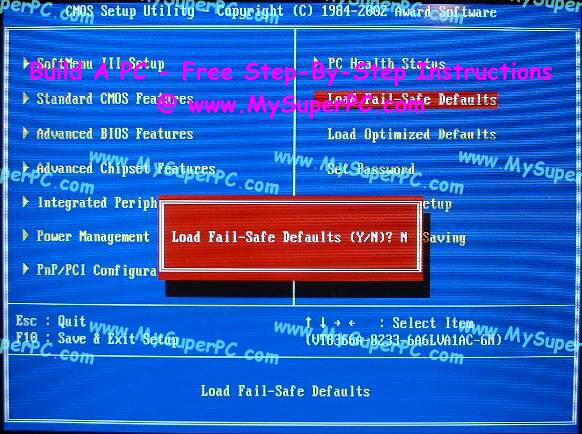
Once in the BIOS, the menu includes an option called "Load Fail-Safe Defaults", which appears on the right-hand portion of the BIOS menu on my ABIT KR7A-133. Use the arrow keys to cursor over to this menu item. When the menu item is highlighted, press the "Enter" key. Any changes made to the CMOS that are saved are remembered the next time the computer boots. The computer has a battery mounted on the motherboard that ensures this data is not lost when the computer is powered off.
A red dialog box appears in the center of the screen with the prompt "Load Fail-Safe Defaults (Y/N)?". Press "y" and then press "Enter". The red dialog box disappears and you are left looking at the main menu.
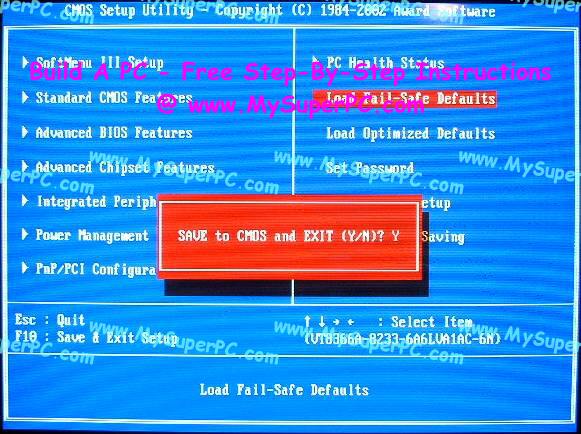
Near the bottom of the CMOS Setup Utility main menu is an information line that states "F10 : Save & Exit Setup". Press the "F10" key. A red dialog box appears with the prompt "SAVE to CMOS and EXIT (Y/N)?". Press "y" and then press "Enter".
The screen goes blank and the computer starts the boot sequence again, so what you see is the same as when the computer was first turned on. Namely, the screen will be blank and nothing will appear to be happening, then the monitor will make a degauss noise and the monitor indicator will change to burn steady green, then the computer will emit a single beep code, and so on.
The difference this time is the "CMOS checksum error - defaults loaded" message will not appear and the computer will proceed further.
A box titled "System Configurations" will be displayed. It will show the detected specifications of the system, such as the CPU Type, CPU Clock, Extended Memory, Pri. Master Disk, and so on. Don't get too concerned about anything shown here at this point because we haven't really configured the computer in the BIOS yet. But at the bottom of the screen you should see something like:
Verifying DMI Pool Data ...........
DISK BOOT FAILURE, INSERT SYSTEM DISK AND PRESS ENTER
Congratulations! You made it as far the computer can go so far! That's great news since it means it's very likely that everything you had to do so far you did correctly!
It's ok to turn off the computer by pushing the power button on the front. Don't forget to turn off the monitor, too.
Back to My Super PC - Home Page
Skip Ahead
Back to My Super PC - Home Page
© 2001-2011, Rob Williams, all rights reserved.
|

|
 Connect the keyboard and mouse into the back of the computer (circled in blue). The connections are color coded and are keyed so they can only be plugged in one way.
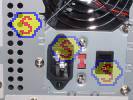 Connect the monitor cable to the video connector on the video card (circled in blue).
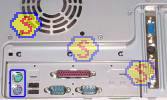 Here's how the back of the case looks with all of these connections made.
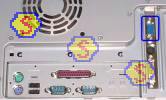 Turn the monitor on and give it 10 seconds to warm up. The monitor should make a degauss noise when you turn it on, which sounds similar to the noise a TV makes you first turn it on. Letting the monitor warm up will ensure you see as much as possible when you turn on the computer. The monitor LED will probably be blinking green.
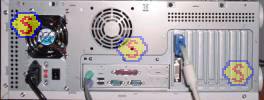
 A red dialog box appears in the center of the screen with the prompt "Load Fail-Safe Defaults (Y/N)?". Press "y" and then press "Enter". The red dialog box disappears and you are left looking at the main menu.
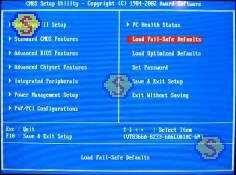 Near the bottom of the CMOS Setup Utility main menu is an information line that states "F10 : Save & Exit Setup". Press the "F10" key. A red dialog box appears with the prompt "SAVE to CMOS and EXIT (Y/N)?". Press "y" and then press "Enter".
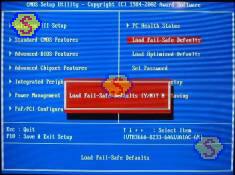 The screen goes blank and the computer starts the boot sequence again, so what you see is the same as when the computer was first turned on. Namely, the screen will be blank and nothing will appear to be happening, then the monitor will make a degauss noise and the monitor indicator will change to burn steady green, then the computer will emit a single beep code, and so on.